Deprecated Integration Methods
3D Secure 1 Test Cards
Following 3D Secure 1 no longer being supported, the test cards used for 3D Secure 1 flows have been deprecated.
Authorisation Successful with 3D Secure 1
|
Card Type |
Card Name |
Card Number |
Expiry Date |
Start Date |
CV2 |
Address |
|---|---|---|---|---|---|---|
|
Visa |
Geoff Wayne |
4976 3500 0000 6891 |
12/25 |
11/20 |
341 |
113 Broad Street West, Oldpine, Strongbarrow SB42 1SX |
|
Visa |
James Marshall |
4921 8100 0000 1909 |
12/25 |
11/20 |
642 |
109 Church Street South, Morcoast, Sagebridge SB1 5JZ |
|
Maestro |
Anthony Walker |
6759 0000 0000 1909 |
12/25 |
11/20 |
784 |
100 Clark Street, Millkeep, Brightburn BB31 2BH |
|
Mastercard |
Jon Robb |
5100 0000 0000 1907 |
12/25 |
11/20 |
654 |
9 Fawn Lane, Edgenesse, Havenfield HF15 8DW |
|
Electron |
Timothy Taylor |
4508 7500 0000 1908 |
12/25 |
11/20 |
159 |
79 Main Street North, Woodhedge, Dorley DO67 9WN |
|
Visa Purchasing |
Ray Sheen |
4001 6506 1790 7186 |
12/25 |
11/20 |
534 |
34 Meadow Lane, Esterbourne, Whitemallow WM10 9RL |
|
Amex |
Mark Dalton |
3400 0006 1790 712 |
12/25 |
11/20 |
5464 |
45 West Street, Silverpond, Faircastle, FC3 1LX |
|
JCB |
Shirley Anderson |
3528 0006 1790 7180 |
12/25 |
11/20 |
642 |
79 Lexington Court, Merrowhaven, Ironelf IE13 4RY |
Authorisation Declined with 3D Secure 1
|
Card Type |
Card Name |
Card Number |
Expiry Date |
Start Date |
CV2 |
Address |
|---|---|---|---|---|---|---|
|
Visa |
Kirsty Catlin |
4282 7300 0000 2397 |
12/25 |
11/20 |
985 |
30 Edgewood Drive, Marbledale, Riverwick RW8 4BZ |
|
Visa |
Fiona Gates |
4921810000008011 |
12/25 |
11/20 |
857 |
3 Windsor Drive, Westerwood, Aldpond AP10 4AY |
|
Maestro |
John Askwith |
6759000000008011 |
12/25 |
11/20 |
078 |
28 Bank Street, Blacknesse, Winterhall WH2 7XN |
|
Mastercard |
Graeme Brown |
5100000000008019 |
12/25 |
11/20 |
871 |
46 Holly Drive, Eastrock, Fairston FS61 4TH |
|
Electron |
Victoria Bury |
4508750000008010 |
12/25 |
11/20 |
656 |
15 Canterbury Road, Fayhollow, Glassrose GR6 1UA |
|
Visa Purchasing |
James O’Hara |
4001651463041773 |
12/25 |
11/20 |
664 |
141 Grant Street, Valvale, Valfort VF5 4BT |
|
Amex |
Damon Corrigan |
340000146304174 |
12/25 |
11/20 |
2445 |
48 Pheasant Run, Castlehaven, Springmage SM4 4BL |
|
JCB |
Philip Ramsey |
3528001463041777 |
12/25 |
11/20 |
724 |
78 Creek Road, Morbridge, Summerwynne SW5 2QA |
Authorisation Referred with 3D Secure 1
|
Card Type |
Card Name |
Card Number |
Expiry Date |
Start Date |
CV2 |
Address |
|---|---|---|---|---|---|---|
|
Visa |
Julie Bean |
4104710000005315 |
12/25 |
11/20 |
487 |
84 Chestnut Street, Butterby, Shoremere SM10 4RR |
|
Visa |
Nigel Munroe |
4921810000000471 |
12/25 |
11/20 |
874 |
55 Somerset Drive, Swynbourne, Fallcastle FC9 1ND |
|
Maestro |
Alice Shouler |
6759000000000471 |
12/25 |
11/20 |
679 |
76 Ridge Road, Vertwick, Wayston WS5 3HQ |
|
Mastercard |
Harry Boot |
5100000000000479 |
12/25 |
11/20 |
555 |
64 Olive Street, Spellfort, Snowwyn SW16 9AD |
|
Electron |
Philippa Waye |
4508750000000470 |
12/25 |
11/20 |
784 |
100 Magnolia Avenue, Cliffhall, Highshore HS15 1AE |
|
Visa Purchasing |
Heston Gibbs |
4001653139120510 |
12/25 |
11/20 |
289 |
45 Garfield Avenue, Brightholt, Estercrystal EC2 6UT |
|
Amex |
Hugh Lowe |
340000041582957 |
12/25 |
11/20 |
2465 |
35 Highland Avenue, Summerham, Ashview AV15 0QX |
|
JCB |
Annette Irons |
3528003139120514 |
12/25 |
11/20 |
232 |
45 Bridge Street, Springwyn, Maplehedge MH3 5UZ |
JudoAdditions / Web SDK
Creating a payment using a OneUseToken has been deprecated and will no longer be updated. See, Authentication Methods
The earlier version of Judopay's Web SDK was also previously known as JudoAdditions. JudoAdditions has been deprecated, however we have made it a simple implementation for you to upgrade and integrate 3D Secure 2 within your payment flow, using the latest version of our Web SDK.
For more details, see Creating a 3D Secure 2 Payment with the Web SDK
Web SDK Version 0.0.29 (and higher) fully supports 3D Secure 1 and 3D Secure 2 flows. No additional support is required, the SDK does the rest.
Make sure your account has 3D Secure 2 enabled. Contact Customer Support to set this up.
Use Judopay's Web SDK to create a payment using a One Use Token.
The one-use token is a different field to the cardtoken.
The one-use token does not authorise any transactions but generates a oneTimeUse token for you to issue a payment request to our API endpoints, or to use our Server SDKs to request payment.
To create a one-use token:
-
Your consumer clicks the Pay button on your website.
-
Use your JudoPay instance to generate a one-use token from the card details fields:
judo.createToken(payment);-
An encrypted Payload is generated (Judopay will decrypt the payload).
-
{
"oneUseToken": "2uhOsi...8KZcn=",
"cardLastfour": "3436",
"endDate": "12/20",
"cardScheme": "Visa",
"cardFunding": "Debit",
"error": false,
"clientDetails": 0
}{
"error": {
"message": "Sorry, we're unable to process your request. Please check your details and try again."
}
}-
The one-use token will be valid for 30 minutes .
-
Use this token to call our Transaction API and process a transaction.
-
You will need to include the one-use token as part of an encrypted card model instance.
Registering a Card for a One Use Token
Using your Judopay API client instance:
-
Create a RegisterEncryptedCardModel to save the consumer's card to Judopay’s card vault:
var encryptedCard = new RegisterEncryptedCardModel
{
    OneUseToken = oneUseToken,
    JudoId = judoId,
    YourConsumerReference = yourConsumerReference,
};

var response = client.RegisterCards.Create(encryptedCard);
var receipt = response.Response as PaymentReceiptModel;

if(receipt.Result === "Success") {
    var cardToken = receipt.CardDetails.CardToken;
}
-
The response will include a card token, which does not expire.
-
The card token can be used in a TokenPaymentModel for the next transaction.
Making a Transaction with a One Use Token
-
Using your Judopay API client instance, create a OneTimePaymentCardModel and immediately process a payment with the one-use token.
-
The response includes a card token:
var oneTimePayment = new OneTimePaymentModel
{
    OneUseToken = oneUseToken,
    JudoId = judoId,
    YourConsumerReference = yourConsumerReference,
    YourPaymentReference = yourPaymentReference,
    Amount: 1.0,
    Currency: "GBP"
};

var response = client.Payments.Create(oneTimePayment);
var receipt = response.Response as PaymentReceiptModel;

if(receipt.Result === "Success") {
    var cardToken = receipt.CardDetails.CardToken;
}
-
Save the card token for the next transaction
-
If 3D Secure is enabled, the response message = Requires 3D Secure
All fields required to run the 3D Secure check will be available in the receipt:
-
acsUrl -
PaReq
-
MD
{
    "receiptId": "415874660497166336",
    "result": "Requires 3D Secure",
    "message": "Issuer authentication required",
    "acsUrl": "https://gw1.paymentsensegateway.com:4430/ACS/Default.aspx",
    "md": "1902...2484",
    "paReq": "eJxd...kqXcvg=="
}
To complete the transaction the 3D Secure form needs to be displayed to the consumer.
This can be achieved in any of the following ways:
-
a redirect
-
pop-up window
-
iframe
Handling 3D Secure 1.0 Payment Flows
Handling 3D Secure 1.0 payment flows has been deprecated and will no longer be updated. See, Creating a Payment with the Web SDK
The following guide is a full working example for use with Judopay's Web SDK, including how to handle 3D Secure Version 1.0 payment flows.
Prerequisites
Judopay's Web SDK requires some additional processing steps, in order to achieve a successful 3D Secure version 1.0 transaction.
This guide assumes the following prerequisites:
-
You are already using Judopay's Web SDK to process standard payments.
-
You have a Judopay Sandbox Account to process test transactions while developing your app.
The sample code uses PHP to directly call our API, however this can also be used as a guide in understanding how to call our API's by other methods.
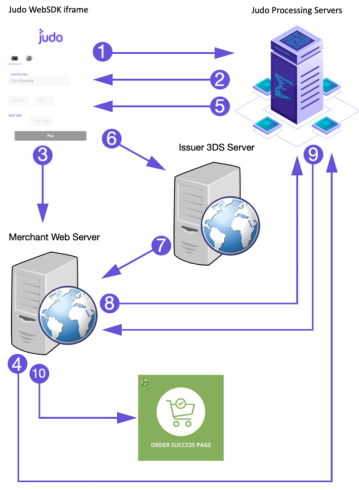
Payment Flow - 3D Secure 1.0
|
Step |
Description |
Payload Example |
|---|---|---|
|
|
Customise and Create the iFrame to present a Pay Button. The Web SDK Pay Button is clicked. |
|
|
|
Payment promise received. |
|
|
|
A oneUseToken is sent to the merchant's server for processing the payment request. |
Use any method you desire to send the token to your back end server to process the request. |
|
|
Merchant's server sends the payment request to Judopay's servers for processing. |
Use any method you desire to send the payment request to Judopay. Judopay has 3 available methods:
|
|
|
Merchant's front end javascript, receives the result sent back to the merchant's server via Judopay. |
|
|
|
Merchant's front end redirects the consumer to:
with the supplied fields including the return URL, for the Issuer to return the 3D Secure result. |
The following parameters are case sensitive. If you do not post these explicitly as indicated below to the acsURL, they will fail.
Example TermURL: The reason to include the receiptID in your TermURL, is so that upon returning from the Issuer's 3D Secure service, you are given the receipt ID in the URL header which you can receive back. You will need this to complete the transaction. The values above should be POSTED to the acsURL. |
|
|
The Issuer's 3D Secure service will return a result of the 3D Secure attempt, from the consumer to the TermURL. |
You will receive the following back from the Issuer Service:
|
|
|
Your TermURL should submit these values to our API for payment processing. |
PHP Sample PUT to Judopay's API endpoint using Curl: |
|
|
Judopay's servers will return either:
|
Example Receipt Object for a Success: |
|
|
Depending on the state received from the receipt object, the merchant can display a success, decline or failure message. |
|


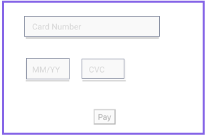
Step 1: Customise and Create the iframe to Present a Pay Button
To customise and create the Judopay Web SDK iframe:
-
Add the code snippet in your web page <HEAD>:
script src="https://web.judopay.com/js/0.0.14/judopay.min.js"></script>
-
This example will use jQuery for a promise, so include the following in your web page <HEAD> :
script src="https://ajax.googleapis.com/ajax/libs/jquery/3.4.1/jquery.min.js"></script>
-
In your <BODY> add a <DIV> tag where you want the iframe to appear.
div id="payment-iframe" width="100%"></div>
This example uses the id: payment-frame. You can use whatever id you wish.
-
In your <BODY> add a <DIV> tag where you want the errors in form entry to appear.
For the purpose of this exercise, the class is named judopay-errors, and sets a style to be red.
-
You can add any custom style you wish in your .CSS file.
-
<div class="judopay-errors" style="color:red">Error Location</div> -
In your <BODY> add a button call: submit-payment-button for the iframe submission to Judopay.
-
Set this to disabled. The iframe will enable it when the input is valid.
-
You can apply any CSS styling you wish to this button.
-
In your <BODY> add the following script for a minimum iframe.
-
This example names this style configMinimum which is used when calling the iframe:
<script>var configMinimum = {
iframe: {
language: "en",
        errorFieldId: 'judopay-errors',
        showCardTypeIcons: true,
        cardTypeIconRight: "10px",
        cardTypeIconTop: "-2px",
        backgroundColor: "#FFFFFF",
        layout: "compact",
        enabledPaymentMethods: ['CARD'],
        isCountryAndPostcodeVisible: false,
        errorsDisplay: "HIDE_UNDER_FIELDS",
        disableUnderline: false,
    }
}
</script>
<button id="submit-payment-button" name="submit-payment" disabled> Pay Now </button>
For the purpose of this exercise, this sample config sets the following options for the iframe:
-
Default language will be English “en”
-
iframe error field location set to “judopay-errors” as set in (4) above
-
Card Icons will display when the card entry is recognised
-
iframe Background Colour is White “#FFFFFF”
-
iframe layout set to compact
-
iframe accepts Credit Card Entry “[‘CARD’]”
-
iframe does not show Post Code entry
-
iframe Errors will not display under the fields
-
iframe will underline the fields and highlight during entry
Create the iframe in a <SCRIPT> tag:
var judo = new JudoPay("yourAPIToken", true);
var payment = judo.createCardDetails('payment-iframe',configMinimum);
The iframe is created in your <SCRIPT> location.
-
Alter yourAPIToken to match your Sandbox API Token.
-
‘true’ lets the iframe know it’s running on sandbox.
-
Set this to ‘false’ when you wish to go live and use a ‘live’ API Token.
-
-
‘payment-iframe’ is where the iframe will load as defined in step (3) above.
-
‘configMinimum’ uses the style called configMinimum as defined in step (5(a)) above.
Step 2: Obtain the Payment Promise
Once you have an established Judopay Web SDK iframe and after the consumer has entered valid card details (the iframe handles the validation and errors of this entry), on clicking the Pay Now button (submit-payment-button) you will obtain a promise from Judopay's servers which will return a oneUseToken for use within 30 minutes to transact the payment.
This is a happy path example, and you should enhance this code with try / catch surrounds.
The following script:
-
Adds an action to the payment button.
-
Checks if the payment method is valid.
-
Calls Judopay to obtain a oneUseToken.
-
It then proceeds to validate the result as having received a oneUseToken.
To setup a payment promise on the Pay Now button:
var paymentPromise = "";
$("#submit-payment-button").click(function(){
   if (judo.getPaymentMethod()=="CARD") {
      var paymentPromise = judo.createToken(payment);
      paymentPromise.then(function(result) {
         if (typeof result.error !== 'undefined') {
            if (typeof result.oneUseToken !== 'undefined') {

                      // This is where the token is sent to your back office for payment
             // request (expanded example below)

            }
         }
      }
   }
}
Step 3: A oneUseToken is sent to Merchant's Server
This example expands on Step 2: Obtain the Payment Promise above, with the source code to handle the oneUseToken and then submit this to the merchant’s server.
-
Insert this quote into the sample above.
This is where the token is sent to your back office for the payment request
-
This sample jQuery calls a php file called handle3.php which will submit the request to Judo and return the result:
$.get("handle3.php",{myToken : result.oneUseToken}, function(data) {

// Code in here to handle the result from the oneUseToken Request will be inserted
// Here and handled in Step 5: Handle the Response from Judopay's Servers
}
);
Step 4: Merchant Server Sends Payment Request to Judopay
This example should be called handle3.php and is the receiving handler from the Step 3: A oneUseToken is sent to Merchant's Server section above.
This example:
-
Receives a oneUseToken from the promise handler step.
-
Submits a £1.00 payment request to Judopay for payment processing using API version 5.7.1
-
Uses
gw1.judopay-sandbox.comas the endpoint. -
For production use the production credentials (APIToken / APISecret) and the endpoint
gw1.judopay.com -
Will return the JSON response received from Judopay's Servers:
<?php
header('Access-Control-Allow-Origin: *');
header('Content-Type: application/json');

$OneUseToken = $_GET["myToken"];

$userEncode = base64_encode("yourAPIToken:yourAPISecret");
$data=json_encode(
array(
'oneUseToken' =>$OneUseToken,
'yourConsumerReference' =>substr(md5(rand()), 0, 7),
'yourPaymentReference' => substr(md5(rand()), 0, 7),
'judoId' => 'yourJudoId',
'amount' => 1.0,
'currency' => "GBP"
));
$headers = array(
Content-Type:application/json',
'Authorization: Basic '.$userEncode,
'API-Version: 5.7.1',
);
$ch = curl_init("https://gw1.judopay-sandbox.com/transactions/payments");
curl_setopt($ch, CURLOPT_RETURNTRANSFER, true);
curl_setopt($ch, CURLOPT_CUSTOMREQUEST, "POST");
curl_setopt($ch, CURLOPT_POSTFIELDS,$data);
curl_setopt($ch, CURLOPT_HTTPHEADER, $headers);
$response = curl_exec($ch);

echo $response;

?>-
Change
yourAPIToken:yourAPISecretfor your API Token and your API Secret.
IMPORTANT: Do not omit the :
-
Change
yourJudoIdfor your JudoID.
Step 5: Handle the Response from Judopay's Servers
-
Extend the handler from the Step 3: A oneUseToken is sent to Merchant's Server section, to handle the response.
This simple example just alerts a Success or Failure response:
$.get("handle3.php",{myToken : result.oneUseToken}, function(data) {

   if (data.result=="SUCCESS") {
     // Handle a Success Result
     var receiptId = data['receiptId'];
     // Handle a Failure, you can look the data result for further detail
     // To add other actions
     alert(‘Payment Success’ + receiptId);
   } else {
     alert(‘Payment Failed’);
   }
}
);-
Checks if the result returned from Judopay's servers = SUCCESS.
-
If Success: Alerts Payment Success with the receiptId.
-
If NOT Success: Alerts Payment Failed.
Receipt Object - SUCCESS
From the Handle the Response from Judopay's Servers section above, the $response will either be a:
-
receiptobject or
-
an ERROR
which you should handle accordingly. This example just echo’s the result from Judopay's Servers.
Example: Receipt Object for a Successful Transaction:
{"receiptId":"615495218204119040",
"yourPaymentReference":"bbd5067",
"type":"Payment",
"createdAt":"2020-08-25T11:38:06.7811+01:00",
"result":"Success",
"message":"AuthCode: 058967",
"judoId":100183086,
"merchantName":"testmerchant",
"appearsOnStatementAs":"APL*/testmerchant ",
"originalAmount":"1.00",
"netAmount":"1.00",
"amount":"1.00",
"currency":"GBP",
"cardDetails":
{"cardLastfour":"6891",
   "endDate":"1220",
   "cardToken":"DgoimaGqpm8ngRKnAl7xgXvFS0zuf3JQ",
   "cardType":1,
   "cardScheme":"Visa",
   "cardFunding":"Credit",
   "cardCategory":"",
   "cardQualifier":0,
   "cardCountry":"FR",
   "bank":"Credit Industriel Et Commercial"},
"consumer":
{"consumerToken":"dQxfNBY5cddXeMhe",
   "yourConsumerReference":"3190912"
},
"riskScore":0,
"threeDSecure":
{"attempted":true,
   "result":"PASSED"},
"externalBankResponseCode":"",
"billingAddress":{}
}|
Parameter |
Description |
|---|---|
|
|
Unique 18 digit reference for the transaction. |
|
|
Unique payment reference you provided, or generated if not provided. |
|
|
Type of transaction:
|
|
|
Date and Time stamp of the transaction. |
|
|
Result of the transaction:
|
|
|
Further details of the result, for example:
|
|
|
The judoId the transaction was associated with. |
|
|
Merchant Name. |
|
|
The name the consumer will see on their statement. |
|
|
Original amount of the transaction. |
|
|
Net amount of the transaction. |
|
|
Transaction currency. |
|
|
Array of card details. |
|
|
Last 4 Digits of the consumer's card. |
|
|
Expiry date of the consumer's card. |
|
|
Unique card token for this card, stored in Judopay's card vault. This can be used to make token payments in the future. |
|
|
Card Type. |
|
|
Card Scheme. |
|
|
Card Funding Scheme. |
|
|
Card Category. |
|
|
Card Qualifier. |
|
|
Card Country of origin. |
|
|
Bank for the Card. |
|
|
Consumer Array. |
|
|
Unique consumer token to be used in conjunction with |
|
|
Unique consumer reference you provided in the originating transaction. |
|
|
JudoShield risk score for the transaction:
|
|
|
3D Secure Array. |
|
|
If 3D Secure was attempted. Boolean. |
|
|
Result of the 3D Secure attempt. |
|
|
Any other External Response Codes. |
|
|
Billing Address. (If provided in the originating transaction). |
Step 6: Re-Direct to the Issuer Service Challenge Screen
The source code from Step 5: Handle the Response from Judopay's Servers, will automatically submit the 3D Secure parameters to the required Issuer Service.
The consumer will be re-directed to the Issuer Service 3D Secure Challenge Screen:
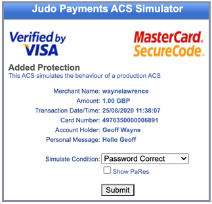
Step 7: Issuer Service Return
If the consumer completes the 3D Secure challenge screen:
-
The issuer service will POST a return encrypted result back to your termURL, as declared in Step 6: Re-Direct to the Issuer Service Challenge Screen,
If the consumer chooses to abandon at this stage, you will receive a no reply POST.
Step 8: Handle the Issuer 3D Secure Result
This example is the return3ds.php file as declared in the sample code from Step 5: Handle the Response from Judopay's Servers.
The following sample POSTs the returned 3D Secure response back to Judopay via an API call to the /transactions endpoint, with the given receiptId.
<?php

$receiptId = $_GET['receiptId'];

if (empty($receiptId))  {
  echo '<BR> Sorry there was an error - missing receiptId';
} else {
  $MD = $_POST['MD'];
  $PaRes = $_POST['PaRes'];
  $data = json_encode(array('Md' =>$MD,'PaRes' =>$PaRes));
  $userEncode = base64_encode("yourAPIToken:yourAPISecret");
  $headers = array(
  'Content-Type:application/json',
  'Authorization: Basic '.$userEncode,
  'API-Version: 5.7.1',
  );
  $ch = curl_init("https://gw1.judopay-sandbox.com/transactions/".$receiptId);
  curl_setopt($ch, CURLOPT_RETURNTRANSFER, true);
  curl_setopt($ch, CURLOPT_CUSTOMREQUEST, "POST");
  curl_setopt($ch, CURLOPT_POSTFIELDS,$data);
  curl_setopt($ch, CURLOPT_HTTPHEADER, $headers);
  $response = curl_exec($ch);
  echo $response;
}
?>-
receiptId is received from the termURL (Sent back from the Issuer 3D Secure Service).
-
A simple check: If no receiptId is set = not proceed. It will just fail.
-
Sets the JSON payload to send to Judopay's Servers.
-
Replace:
yourAPIToken:yourAPISecretwith your Sandbox API Token and API Secret. -
Curl Options sets the endpoint to:
-
For Sandbox:
https://gw1.judopay-sandbox.com/transactions/ -
For Production change to:
https://gw1.judopay.com/transactions/including the Production API Token and Production API Secret.
-
This will complete or fail the transaction accordingly.
-
The sample just echo’s the response received from Judopay's Servers (JSON Payload). The response will either be
SUCCESS | DECLINED | ERROR
Step 9: Redirect the Consumer to the Appropriate Location
As a result of the receiptObject received in Step 5: Handle the Response from Judopay's Servers, you should redirect the consumer accordingly.
For example, if the result = SUCCESS redirect the consumer to the Success Page, else ERROR.
You can store any of the receiptObject details in your own back office systems for recall later.
You could store the:
-
cardToken
-
consumerToken
-
cardDetails
against the consumer's record and offer a quick checkout option for future transactions.
Using those tokens bypasses the need to enter any card details if required.
Web Payments - Version 1
Version 1 web payments integration has been deprecated and will no longer be updated.
For version 2, see, Web Payments Set Up
Web Payments (Version 1) - Transaction Request
To create a transaction request:
Request
https://api-sandbox.judopay.com/webpayments/payments
--header 'Api-Version: 6.4' \
--header 'Content-Type: application/json' \
--header 'Authorization: Basic XXXXXXXXXXXXXXXXXXXXXXXXXXXXXXXXXXXXXXXXXXXXXXXXXXXXXXXXXX' \
--data-raw '{
       "judoId":"100016172",
       "amount": 125.00,
       "currency": "GBP",
        "yourConsumerReference": "example_customer_reference_00001",
        "yourPaymentReference": "example_payment_reference_00001",
        "yourPaymentMetaData":{
            "invoiceNumber": "000546" ,
            "customerNumber": "ABC123456"
                },
         "clientIpAddress": "127.0.0.1",
         "clientUserAgent": "example browser 5.25"
}
For more information on the message request structure, see Request Message Structure.
Response Reference - Version 1
"postUrl": "https://pay.judopay-sandbox.com/v1",
"reference": "yth67_82nhjmf903jnmaiine…"
The reference example has an expiration time of 30 minutes.
If the transaction is not completed within this time, the transaction will Fail and the status = Expired.
Web Payments (Version 1) - PreAuth Transaction Request
Use webpayments/preauths to reserve funds on a consumer's account.
Preauths will postpone the completion of the transaction until the goods have been delivered or the service fulfilled.
To create a preauth request:
Request:
https://api-sandbox.judopay.com/webpayments/preauths
{
    "judoId":"958389",
    "amount":1.01,
    "yourConsumerReference":"JudoTest?0000771",
    "yourPaymentReference":"{{$guid}}",
    "currency":"GBP"
}
Response Reference - Version 1
{
"payByLinkUrl": "https://pay.karatepay.com/KDyPdg",
"postUrl": "https://pay.karatepay.com/v1",
"reference": "5QcAAAEAAAAbAAAAEAAAAHZVMqgikR_bu-hMzNlt8pHULA3kxJaF9-pulnDlTfvKusklaQ"
}
React Native V2.1
Version 2.1 is now deprecated.
For Mobile apps, it is recommended not to make a transaction from the app, as the Token and Secret could become compromised.
Use the server to make the transaction.
Create a Register Card app and enable the Register Card Transactions permission.
Requirements
-
Version 0.62+
Installing React-Native
-
In your package.json file add under scripts section:
postinstall": "node node_modules/judo-react-native/scripts/sample-app_postinstall.js node_modules/judo-react-native"
-
Under the dependencies section add:
judo-react-native": "file:../",In your root project folder run:sh rm yarn.lock && rm -rf node_modules yarn install
-
Navigate to ios/folder and run:
rm -rf Pods/ && rm Podfile.lock pod install
To run the Judopay React Native SD:
-
Import:
import {
  RNJudo,
  type JudoOptions,
  type JudoApplePayOptions,
  type JudoGooglePayOptions,
  type PaymentOptions
} from "judo-react-native";-
Configure the JudoOptions object:
const judoOptions: JudoOptions = {
  token: "<TOKEN>",
  secret: "<SECRET>",
  judoId: "<JUDO_ID>",
  isSandbox: true,
  amount: "0.01",
  currency: "GBP",
  consumerReference: "myCustomerReference",
  paymentReference: "myPaymentReference",
  metaData: {metadatakey: "metadataValue", metadatakey2: "metadataValue2"}
};
token | secret | judoId | amount | currency = mandatory fields.
You will need to pass the judoOptions object each time you want to make a call to the JudoPay React Native SDK.
Setting Up React Native
To create a Payment:
try {
  let response = await RNJudo.makePayment(judoOptions);
  if (response.result === "Success") {
    //Handle successful result
  } else {
    //Handle unsuccessful result
  }
} catch (e) {
    //handle error
}
To create a PreAuth:
try {
  let response = await RNJudo.makePreAuth(judoOptions);
  if (response.result === "Success") {
    //Handle successful result
  } else {
    //Handle unsuccessful result
  }
} catch (e) {
  //handle error
}
response object will contain all data contained in JPTransactionData.h the same field is exposed in Android. e - error.
All error codes found in NSError+Judo.h are the same for Android.
Payment Methods UI
For the payment methods UI to appear, pass the following 3 objects:
-
paymentOptions
-
applePayOptions
-
googlePayOptions
Payment Options
Select one of the following constants:
const paymentOptions: PaymentOptions = {
  paymentMethods: RNJudo.PAYMENT_METHOD_NONE
};
Payment method types: {
  RNJudo.PAYMENT_METHOD_NONE
  RNJudo.PAYMENT_METHOD_CARD
  RNJudo.PAYMENT_METHOD_GOOGLE_PAY
  RNJudo.PAYMENT_METHOD_APPLE_PAY
  RNJudo.PAYMENT_METHOD_ALL
}
Call showPaymentMethods:
try {
  let response = await RNJudo.showPaymentMethods(
    Object.assign({}, judoOptions, applePayOptions, googlePayOptions, paymentOptions)
  );
  if (response.result === "Success") {
    //Handle successful result
  } else {
    //Handle non-success flow
  }
} catch (e) {
    //handle error
}
Apple Pay Options
Apple Pay configuration:
try {
  let response = await RNJudo.showPaymentMethods(
    Object.assign({}, judoOptions, applePayOptions, googlePayOptions, paymentOptions)
  );
  if (response.result === "Success") {
    //Handle successful result
  } else {
    //Handle non-success flow
  }
} catch (e) {
    //handle error
}
Select one of the following constants:
Transaction types: {
  RNJudo.APPLE_PAY_TRANSACTION_PAYMENT
  RNJudo.APPLE_PAY_TRANSACTION_PAYMENT
}

Shipping types: {
  RNJudo.APPLE_PAYMENT_SHIPPING
  RNJudo.APPLE_PAYMENT_DELIVERY
  RNJudo.APPLE_PAYMENT_STORE_PICKUP
  RNJudo.APPLE_PAYMENT_SERVICE_PICKUP
}

Apple Pay payment summary item types: {
  RNJudo.APPLE_PAYMENT_SUMMARY_FINAL
  RNJudo.APPLE_PAYMENT_SUMMARY_PENDING
}

Apple pay button light/dark styles: {
  RNJudo.APPLE_PAY_BUTTON_THEME_LIGHT
  RNJudo.APPLE_PAY_BUTTON_THEME_DARK
}
To make an Apple Pay transaction:
try {
  let response = await RNJudo.makeApplePayPayment(
    Object.assign({}, judoOptions, applePayOptions)
  );
  if (response.result === "Success") {
    //Handle successful result
  } else {
    //Handle non-success flow
  }
} catch (e) {
    //handle error
}
You can call judoOptions and applePayOptions, the same as showPaymentMethods.
Google Pay Options
Google Pay configuration:
const googlePayOptions: JudoGooglePayOptions = {
  googlePayTestEnvironment: false,
  isPayment: false, // pre-auth
  isRequestBilling: false,
  isRequestContactDetails: false,
  isRequestShipping: false
};
To make a Google Pay transaction:
try {
  let response = await RNJudo.makeGooglePayPayment(
    Object.assign({}, judoOptions, googlePayOptions)
  );
  if (response.result === "Success") {
    //Handle successful result
  } else {
    //Handle unsuccess flow
  }
} catch (e) {
    //handle error
}
You can call judoOptions and googlePayOptions, the same as showPaymentMethods.
Google Pay™ as a Payment Method
Configuring the Wallet
Wallet Configuration is now deprecated.
There are two environments for Google Pay™:
-
Sandbox
-
Production
Ensure you configure the Wallet to specify your payment environment.
This is reflected by the WalletConstants enum in the android wallet package:
public static final int PAYMENTS_ENVIRONMENT = WalletConstants.ENVIRONMENT_PRODUCTION;
public static final int PAYMENTS_ENVIRONMENT = WalletConstants.ENVIRONMENT_SANDBOX;
Google Pay™ supports both tokenized and non-tokenized cards.
Tokenised: Google Pay™ generates a token which represents the card. Only this token is sent when making a payment. Your customer's card number does not leave Google Pay™.
For security reasons, Judopay only currently supports tokenized cards.
Therefore you must configure your application to only support the tokenized card method.
This means any invalid cards will not appear as a payment option when your consumer tries to pay with your application.
public static final List<Integer> SUPPORTED_METHODS = Arrays.asList(
   // PAYMENT_METHOD_TOKENIZED_CARD refers to EMV tokenized credentials stored in the
   // Google Pay app, assuming it's installed.
        WalletConstants.PAYMENT_METHOD_TOKENIZED_CARD
);
1. Set the Gateway name to judopay: public static final String GATEWAY_TOKENIZATION_NAME = "judopay";
2. When creating a new PaymentsClient (another Android class), initialise it with the PAYMENTS_ENVIRONMENT, and the activity launching your payment:
public static PaymentsClient createPaymentsClient(Activity activity) {
    Wallet.WalletOptions walletOptions = new Wallet.WalletOptions.Builder()
            .setEnvironment(Constants.PAYMENTS_ENVIRONMENT)
            .build();
    return Wallet.getPaymentsClient(activity, walletOptions);
}
3. Set the tokenization parameters with your merchant ID (Judo ID):
public static final List<Pair<String, String>> GATEWAY_TOKENIZATION_PARAMETERS = Arrays.asList(
    Pair.create("gatewayMerchantId", "{YOUR_JUDO_ID}")
);
4. Specify the card networks to support, and the allowed shipping countries. This might vary depending on your application and product.
// The allowed networks to be requested from the API. If the user has cards from networks not
// specified here in their account, these will not be offered for them to choose in the popup.
public static final List<Integer> SUPPORTED_NETWORKS = Arrays.asList(
        WalletConstants.CARD_NETWORK_AMEX,
        WalletConstants.CARD_NETWORK_DISCOVER,
        WalletConstants.CARD_NETWORK_VISA,
        WalletConstants.CARD_NETWORK_MASTERCARD
);

// Supported countries for shipping (use ISO 3166-1 alpha-2 country codes).
// Relevant only when requesting a shipping address.
public static final List<String> SHIPPING_SUPPORTED_COUNTRIES = Arrays.asList(
        "US",
        "GB"
);
Generating a Google Pay™ Payment
In your checkout activity:
-
Find the view/button to trigger the payment
-
Add the request payment listener
The Google Pay sample application project has a sample view layout for a Google Pay button you can use
(googlepay_button.xml) which follows the Google Pay style conventions.
// Arbitrarily-picked result code.
private static final int LOAD_PAYMENT_DATA_REQUEST_CODE = 991;

@Override
protected void onCreate(Bundle savedInstanceState) {
    super.onCreate(savedInstanceState);
    setContentView(R.layout.activity_checkout);


    mGooglePayButton = findViewById(R.id.googlepay_button);
    mGooglePayStatusText = findViewById(R.id.googlepay_status);

    mGooglePayButton.setOnClickListener(new View.OnClickListener() {
        @Override
        public void onClick(View view) {
            requestPayment(view);
        }
    });

    // It's recommended to create the PaymentsClient object inside the onCreate method.
    mPaymentsClient = PaymentsUtil.createPaymentsClient(this);
    checkIsReadyToPay();
}

// This method is called when the Pay with Google button is clicked.
public void requestPayment(View view) {
    // Disables the button to prevent multiple clicks.
    mGooglePayButton.setClickable(false);

    // The price provided to the API should include taxes and shipping.
    // This price is not displayed to the user.
    String price = PaymentsUtil.microsToString(YOUR_ITEM_PRICE);

    TransactionInfo transaction = PaymentsUtil.createTransaction(price);
    PaymentDataRequest request = PaymentsUtil.createPaymentDataRequest(transaction);
    Task<PaymentData> futurePaymentData = mPaymentsClient.loadPaymentData(request);

    // Since loadPaymentData may show in the UI asking the user to select a payment method, we use
    // AutoResolveHelper to wait for the user interacting with it. Once completed,
    // onActivityResult will be called with the result.
    AutoResolveHelper.resolveTask(futurePaymentData, this, LOAD_PAYMENT_DATA_REQUEST_CODE);
}

private void checkIsReadyToPay() {
    // The call to isReadyToPay is asynchronous and returns a Task. We need to provide an
    // OnCompleteListener to be triggered when the result of the call is known.
    PaymentsUtil.isReadyToPay(mPaymentsClient).addOnCompleteListener(
            new OnCompleteListener<Boolean>() {
                public void onComplete(Task<Boolean> task) {
                    try {
                        boolean result = task.getResult(ApiException.class);
                        setGooglePayAvailable(result);
                    } catch (ApiException exception) {
                        // Process error
                        Log.w("isReadyToPay failed", exception);
                    }
                }
            });
}

private void setGooglePayAvailable(boolean available) {
    // If isReadyToPay returns true, show the button and hide the "checking" text. Otherwise,
    // notify the user that Pay with Google is not available.
    // Please adjust to fit in with your current user flow. You are not required to explicitly
    // let the user know if isReadyToPay returns false.
    if (available) {
        mGooglePayStatusText.setVisibility(View.GONE);
        mGooglePayButton.setVisibility(View.VISIBLE);
    } else {
        mGooglePayStatusText.setText(R.string.googlepay_status_unavailable);
    }
}-
Create the PaymentDataRequest, passing in the gateway name and parameters set earlier.
-
Ensure to set the tokenization type as:
WalletConstants.PAYMENT_METHOD_TOKENIZATION_TYPE_PAYMENT_GATEWAY:
public static PaymentDataRequest createPaymentDataRequest(TransactionInfo transactionInfo) {
    PaymentMethodTokenizationParameters.Builder paramsBuilder =
            PaymentMethodTokenizationParameters.newBuilder()
                    .setPaymentMethodTokenizationType(
                            WalletConstants.PAYMENT_METHOD_TOKENIZATION_TYPE_PAYMENT_GATEWAY)
                    .addParameter("gateway", Constants.GATEWAY_TOKENIZATION_NAME);
    for (Pair<String, String> param : Constants.GATEWAY_TOKENIZATION_PARAMETERS) {
        paramsBuilder.addParameter(param.first, param.second);
    }

    return createPaymentDataRequest(transactionInfo, paramsBuilder.build());
}

private static PaymentDataRequest createPaymentDataRequest(TransactionInfo transactionInfo,
PaymentMethodTokenizationParameters params) {
    PaymentDataRequest request =
            PaymentDataRequest.newBuilder()
                    .setPhoneNumberRequired(false)
                    .setEmailRequired(true)
                    .setShippingAddressRequired(true)

                    // Omitting ShippingAddressRequirements altogether means all countries are
                    // supported.
                    .setShippingAddressRequirements(
                            ShippingAddressRequirements.newBuilder()
                                    .addAllowedCountryCodes(Constants.SHIPPING_SUPPORTED_COUNTRIES)
                                    .build())

                    .setTransactionInfo(transactionInfo)
                    .addAllowedPaymentMethods(Constants.SUPPORTED_METHODS)
                    .setCardRequirements(
                            CardRequirements.newBuilder()
                                    .addAllowedCardNetworks(Constants.SUPPORTED_NETWORKS)
                                    .setAllowPrepaidCards(true)
                                    .setBillingAddressRequired(true)

                                    // Omitting this parameter will result in the API returning
                                    // only a "minimal" billing address (post code only).
                                    .setBillingAddressFormat(WalletConstants.BILLING_ADDRESS_FORMAT_FULL)
                                    .build())
                    .setPaymentMethodTokenizationParameters(params)

                    // If the UI is not required, a returning user will not be asked to select
                    // a card. Instead, the card they previously used will be returned
                    // automatically (if still available).
                    // Prior whitelisting is required to use this feature.
                    .setUiRequired(true)
                    .build();

    return request;
}
Handle a Successful Payment
Catch the payment result in your checkout activity:
public void onActivityResult(int requestCode, int resultCode, Intent data) {
    switch (requestCode) {
        case LOAD_PAYMENT_DATA_REQUEST_CODE:
            switch (resultCode) {
                case Activity.RESULT_OK:
                    PaymentData paymentData = PaymentData.getFromIntent(data);
                    handlePaymentSuccess(paymentData);
                    break;
                case Activity.RESULT_CANCELED:
                    // Nothing to here normally - the user simply cancelled without selecting a
                    // payment method.
                    break;
                case AutoResolveHelper.RESULT_ERROR:
                    Status status = AutoResolveHelper.getStatusFromIntent(data);
                    handleError(status.getStatusCode());
                    break;
            }

            // Re-enables the Pay with Google button.
            mGooglePayButton.setClickable(true);
            break;
    }
}
The function below demonstrates how to handle the payment request returned from the intent, and send on the necessary tokenized card details to the Judopay API to be processed:
private void handlePaymentSuccess(PaymentData paymentData) {
    // PaymentMethodToken contains the payment information, as well as any additional
    // requested information, such as billing and shipping address.
    PaymentMethodToken token = paymentData.getPaymentMethodToken();

    // getPaymentMethodToken will only return null if PaymentMethodTokenizationParameters was
    // not set in the PaymentRequest.
    if (token != null) {
        String encryptedToken = token.getToken();
        String cardNetwork = paymentData.getCardInfo().getCardNetwork();
        String cardDetails = paymentData.getCardInfo().getCardDetails();

        JudoApiService apiService = getJudo().getApiService(getApplicationContext());
        GooglePayRequest request = getGooglePayRequest(encryptedToken, cardNetwork, cardDetails);
        apiService.googlePayPreAuth(request);
    }
}

private GooglePayRequest getGooglePayRequest(String encryptedToken, String cardNetwork, string cardDetails) {
    return new GooglePayRequest.Builder()
            .setJudoId("YOUR_JUDO_ID")
            .setGooglePayWallet(new GooglePayWallet.Builder()
                    .setCardNetwork(cardNetwork)
                    .setCardDetails(cardDetails)
                    .setToken(encryptedToken)
                    .build())
            .setAmount(YOUR_PRICE)
            .setCurrency(Currency.GBP)
            .setConsumerReference(UNIQUE_GUID)
            .build();
}
iOS Swift
iOS Swift SDK has been deprecated and will not longer be updated.
You will get the following warning when you submit your app to the Apple app store:"ITMS-90809:
Deprecated API Usage - App updates that use UIWebView will no longer be accepted as of December 2020.
Instead, use WKWebView for improved security and reliability.
To integrate, see our new iOS SDK Integration with Judopay.
Getting started
If you haven’t chosen your integration method yet, begin by selecting your method and following the What to do next steps first.
Integrate simple and secure in-app card payments into your iOS Swift app with our Judopay SDK.
Judopay’s Out-of-the-box UI comes with built-in checks and security features, including real-time error detection, 3D Secure, data and address validation for frictionless card data capture.
This minimises PCI compliance and allows you focus on developing other areas of your app.
See our UI customization guide to learn more.

Integration Requirements
-
Versions of the SDK greater or equal to 6.2.5 require Xcode 8 and Swift 3.
-
Version 6.2.4 is the last version to be support Xcode 7.3.1 and Swift 2.2.
Add the Swift SDK to the top of the file where you want to use it:
Install Cocoapods with the following command: $ gem install cocoapods
If you are not integrating using Cocoapods, please visit our guides for Carthage integration.
Add Judopay to your Podfile to integrate it into your Xcode project.
source 'https://github.com/CocoaPods/Specs.git'
platform :ios, '8.0'
use_frameworks!
pod 'JudoKit', '~> 6.2'
Install the new pod in your project: $ pod install
Please ensure that you always use the newly generated .xcworkspace file instead of the .xcodeproj file.
In Xcode, go to the Project Navigator called ‘Pods’, select the JudoKit target and open the tab called Build Phases.
Add a new Run Script Phase and drag it above the Compile Sources build phase.
Include the following line in the shell script: h "${PODS_ROOT}/DeviceDNA/Framework/strip-frameworks-cocoapods.sh"
Setup
To start setting up your app, please complete all the relevant integration steps in the getting started section.
By following these steps, you are ensuring that your app will be secure and frictionless for you and your customers.
If you have completed the setup section, start using Judopay’s iOS Swift SDK by adding your app’s token and secret when initializing the SDK:
var judoKitSession = JudoKit(token: token, secret: secret)
Command the SDK to communicate with sandbox environment by including the following line where the payment is initiated in the ViewController:
self.judoKitSession.sandboxed(true)
Point to the live environment
In your app’s ViewController, find and delete the following line that specifies the targeted environment:
self.judoKitSession.sandboxed(true)
Replace your sandbox API token and secret for the live API token and secret in the correspondent line.
Both credentials are located in the dashboard, under the Your apps section.
Follow our Access token and secret guide if you need help to find them.
var judoKitSession = JudoKit(token: token, secret: secret)
Ruby Server SDK
Ruby Server SDK has been deprecated and will no longer be updated.
Easily handle simple and secure payments on your back-end with the Judopay Ruby server side SDK.
If you haven’t chosen your integration method yet, begin by selecting your method and following the What to do next steps first.
Integration Requirements
-
Ruby 1.9.3 and above (including 2.0.x and 2.1.x).
-
Add the following line to your application’s Gemfile:
gem 'judopay'
-
Once the Gemfile is set, then there are two options to finish the installation:
-
Execute the following line:
$ bundle-
-
Or install it yourself as:
$ gem install judopay
Setup
To start setting up your app, please complete all the relevant integration steps in the setup section.
By following these steps, you are ensuring that your app will be secure and frictionless for you and your customers.
When you have completed the setup, start using Judopay’s PHP SDK by adding your app’s token and secret when initializing the SDK:
Judopay.configure do |config| config.judo_id = 12345 config.api_token = 'your-token'
config.api_secret = 'your-secret'
# Set to true on production, defaults to false which is
#the sandbox config.use_production = false
end
Remember, if you perform payments only from your backend, you should only enable the Register Card Transactions permission for your app and create a separate app for your backend with only the Make Payments permission enabled.
Processing transactions with AmEx cards requires that your account supports it as well.
Please contact us first if you are planning to accept AmEx.
The SDK allows further configuration:
Logging
You will be able to attach a logger library to help you debug your Judopay integration.
Point to the live environment
-
In the Judopay gem, find and change the production environment setting from ‘false’ to ‘true’.
-
Replace your sandbox API token and secret for the live API token and secret in the corresponding lines.
-
Both credentials are located in the dashboard, under the Your apps section.
-
Follow our Access token and secret guide if you need help to find them.
Judopay.configure do |config| config.judo_id = 12345 config.api_token = 'your-token'
config.api_secret = 'your-secret'
# Set to true on production, defaults to false
#which is the sandbox config.use_production = true
end